Showing posts with label daenerys cosplay. Show all posts

Wednesday, June 29, 2016

Daenerys Dragon Collar for Game of Thrones Cosplay


Hello my dragon queens!  I FINALLY finished this Dany inspired dragon collar.  Phew!  I'm pretty happy with how this came out.  She wears this piece at the end of season 5 of Game of Thrones and the beginning of season 6.  It's really awesome symbolism to see a dragon curled around her neck again like we saw when her dragons were still babes.  Okay, so a little about the collar:

Every inch was patiently hand sculpted so that every part of this collar would look authentic.  I built the sculpt around a stainless steel skeleton then moved around the clay until I was happy.   This is where you have to be patience if you're making your own.  I used a tooth pick and clay picks for the details.


For the scales, I cut a triangle in a piece of thin cardstock and pressed it into the clay to create this pattern.  I then went back in with clay tools to give individuality to each scale.


The tail end was done the same way.


Okay, so the attachments were what gave me the most trouble.  I experimented with a lot of mediums and ultimately decided EVA foam would be best for them.  I cut out different shapes until I was happy and attached with a strong adhesive.  I used the opposite side of an exacto blade to press details into the foam until I thought it looked cool. :p  Painted with a dark silver first, letting it slip into the creases, then went over with lighter silvers.  Finally I finished with a little Silver Leaf Rub and Buff to give this piece a very authentic metal finish despite being clay.


And this is the finished product!  Yay!


This pic was taken before I put the final paint coat on, so it photographed a bit dull.  Ugh! (I was just really impatient to be back in my Dany wig! :P )

I currently have these dragon collar on sale in my shop!

I want to also make a tutorial for this dragon collar, but I'm not sure how helpful it will be just because of how involved it was to make this.  If you're making your own, feel free to drop me a comment or message and I'll try to help you the best I can! :D

Valar Morghulis you Khaleesi's out there!


Monday, March 7, 2016

Daenerys Ring Game of Thrones Season 5


Hiya!  So here is my updated version of my inspired Daenerys ring from Game of Thrones.


I ended up using Super Sculpey instead of Original Sculpey and was a lot more satisfied with the results.


Dany typically wears the ring on her ring finger, but the size I made was a little too big for mine. X )


You can purchase the ring in my Etsy Shop here:

Valar Morghuilis!


Thursday, January 8, 2015

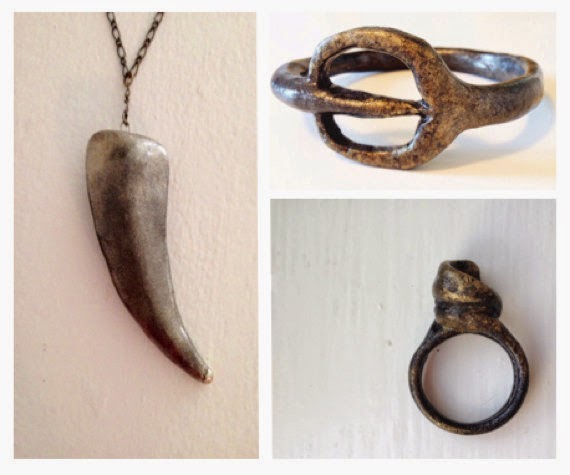
New Daenerys Jewelry Set in my Etsy Shop


Hello my winter children!  I wanted to share with you the three piece Daenerys Set I have now available in my Etsy shop.  (Click here to see my shop!)  The set includes Daenerys' necklace, her bangle bracelet, and ring.  Each item can be customized to fit you best!  Just leave me a note in 'Note to Seller' with detailed instructions.

As a thank you to those of you who follow my blog, please use this coupon code for 10% your entire order:

JELLYFISHSOUP10
for 10% off!

That aside, are you guys excited for season 5 coming out?!  I am!  I'm currently working on some of the jewelry I've been able to spot in set photos and promo vids, so check back soon for those pieces!

Peace out!


Tuesday, August 19, 2014

Daenerys Costume Patterns by Simplicity

Hi there!  Long time no... type and read?  Buwhahaha!  So, recently I was wondering through my local fabric store when I stumbled upon an awesome pattern that may be of great use to some of you....  

I couldn't believe my eyes when I saw these Dany and Tauriel patterns!  And, on top of that, they each look very authentic and very much like the actual costumes.  Anyways, I thought I'd share this with ya'll in case any of you were thinking of making these for upcoming cons or Halloween parties.

Let me know if any of you end up using these patterns!  I'm very curious to see how it turns on! :3

Oh, and if you're looking to make Dany's Astapor blue dress, check out my guide and tutorial here!


Wednesday, January 29, 2014

Daenerys Swag

Bonjour, mes petites flocons de neige! (Hello, my little snowflakes)

I hope you're all keeping warm in these wintery months.  If you live in the mid-west, like moi, you're probably cursing this arctic weather we're having.  I wouldn't mind the cold if it didn't make driving so darn difficult.  Every morning I say a prayer that my car will start despite the freezing temperatures.  Does it work?  Not usually, but ah well.  Three cheers for jumper cables!  Hoozah!

In other news, I finally made a FB page for those of you who want to follow only my Cosplay stuff.  Iz right here: ADD MEH ON FB BRAH

So I've had several requests for a few more Dany items, and I'm happy to finally bring them to you:

D A E N E R Y S  R I N G  

Yay!  Dany's ring!  I never wanted to make this before 'cause I could never find good shots of it, and I really didn't want to make a replica when I had little knowledge of how it looked.  Finally, I tracked down upclose photos of the ring, and without further ado:


I used a light weight aluminum metal for the ring portion and polymer clay for the top accent part.  I painted it with acrylic paints and added texture.  Then I slopped like literally ten coats of satin finish to it 'cause I was worried it wouldn't be durable enough.  Thankfully, it's been plenty durable.  I've been puttin' this baby through all kinds of wear and it's been holding up better than I expected.   


This ring and more is available in my Etsy shop.  (Link to your right!)


D A E N E R Y S  C O W L  


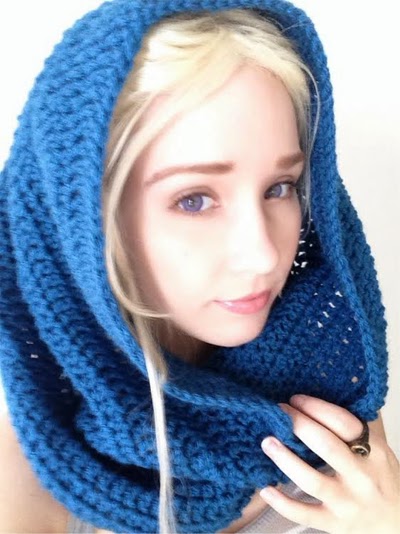
I fell in love with Dany's season 3 sapphire dress, and I really wanted to implement elements of her style into my own daily fashion.  And TADA!  A Dany inspired hooded cowl!  I cannot get enough of cowls, especially ones large enough to wear as a hood.  They look so chic I could squeak.  (WTF, why would that make me squeak?)  Anyways, they're super practical for the chillier months.  I never leave my house without one.    


The cowl is made with 100% acrylic yarn, so it's super soft and warm.  


And it also doubles as a ninja outfit!  HIYA!  (Available in my Etsy shop!)


I notice in GoT's season 4 trailer, Dany is still wearing her statement slave collar.  And I thought I'd share this updated version of my collar.  I really tried to use texture and color to replicate the cast iron look.  How'd I do? : )

Alright, that's all I got for today, loves.  Let me know what kind of tutorials you guys would like to see next!

Au revoir, my little dragons!


Wednesday, July 24, 2013

Daenerys Cosplay Pattern and Makeup Tutorial


UPDATE: I've updated this pattern to make it a better and more comprehensive guide!  If you were in the middle of this tutorial as I'm updating, just email me and I can send you the original one. : )

Hi there guys!  So this  ^  is my makeup attempt at Daenerys.  (Eyes were digitally changed violet because I didn't have time to order the circle lenses for this cosplay : | )   She is easily my favorite cosplay to date, because, well, how can you go wrong with the Mother of Dragons?!

Anywhos, I've been getting messages for advice on this cosplay, so I decided to just write one big post with my tips and suggestions.  Ahem, let the cosplay goodness begin!


B R E A K D O W N  of   M A K E U P : 

Her makeup is a very simple look, but what I've found is most important when cosplaying is highlighting and contouring.  It really makes a huge difference!  So I put together a simple tutorial on Youtube for anyone that may find it useful.  


Here's a list of the makeup I used in the above tutorial:
  • That Gal by Benefit ( Primer / Highlight )
  • Super BB by Skin79 ( BB Cream Coverage )
  • Lucidty in Light by Estée Lauder ( Translucent Pressed Powder )
  • Naked Palette by Urban Decay ( Eye Shadow / Contouring Powder )
  • They're Real! by Benefit ( Mascara )
  • NYX Lipliner Pencil in Nude Pink
  • Bella Bamba by Benefit ( Brightening Blush )
  • NYX Pump It Up ( Lip Plumper ) 

  
If you want to be true to the books, I'd recommend purchasing violet circle lenses.  My favorite for this cosplay are the G&G GBT Violet ones from Candylens.com.  I highly recommend this company to order lenses from!  They personally emailed me to make sure my lenses arrived and that I was happy with them.  AND they sent me a hand written 'Thank You' note for my purchase.  How many companies do that now-a-days?


These ones have a 14.0 mm diameter meaning they're about the size of your own iris and consequently will look very natural.  (Note: this brand is not designed for those with astigmatisms.  Please do some research if you're a first time circle lens wearer, because your eyes are very precious!  ^_^ ) 


B R E A K D O W N  of   C O S T U M E :

So here is my initial sketch of Daenerys' blue dress from season 3.  After careful inspection (pausing the DVR in a million spots) I decided that instead of princess seams her dress merely had front and back darts.  I also decided a side invisible zipper would be best this fit.  
  

Below is a rough pattern for the dress.  PLEASE, if you use this guideline, use it on a cheap piece of muslin or fabric first to draft your own pattern for your body type.  That way you can make adjustments as necessary without having to cut into your expensive costume fabric.  Also, this pattern does not contain seam allowances, so you will need to factor those in.  I recommend using a lining fabric for each piece, but if you're in a hurry you can save time by only using lining (or doubling the same fabric) for the front bodice pieces and the back for the keyhole.  


D R A F T I N G  Y O U R  P A T T E R N 

Okay, these are directions for creating your pattern.  This will be done on muslin or cheaper fabric. Essentially we'll be putting the pieces together, trying it on, mark it where it needs adjustments, adjust 'til happy, pull the pieces apart and VOILA!  You'll have your pattern!  Since this is just a pattern, no need to worry about hemming or anything like that.

You will need:
  • muslin/cheap fabric
  • sewing machine
  • thread
  • measuring tape
  • scissors
  • seam ripper 
  • dress form (this makes things so much easier, but you can manage without one)
  • pattern pieces 
    • front
    • right and left back panels
    • right front bodice
    • left front bodice
    • side/back skirt x3


  1. Iron your pattern fabric.  
  2. Measure your body and figure out the measurements for pattern piece on my pattern guide above.  
  3. Use your tape measure to draw out your pattern using measurements onto your muslin/cheap fabric.  Remember, this is just a pattern, so you can mark it up however you like! And don't forget to mark the letters, darts, and name of each piece. 
  4. IMPORTANT: my pattern guide does not include seam allowances (the area between the edge of fabric and the stitching line), so you will need to add this.  I would add at least 5 inches to give you plenty of fabric to work with and to put in the dart.  (It's a lot easier to cut away excess fabric than it is to repair something with too little fabric) Draw this line in a different color to distinguish the two lines.  It should look something like the red and black lined drawing.  
  5. Cut your pieces at the red line!
  6. If you have a dress form, rejoice!  This step will be a lot easier.  Set your dress form to your measurements and begin pinning the pieces together on your form as I outline below.  If you don't have one, you're gonna have to do more guess and check.  Pin your pieces together as I have outlined below before sewing.   
  7. Sew your darts!  Here's a good tutorial if you're not sure what these are: here!  We're going to be doing Double Point Darts.  
    1. Front Darts:  Top points at f and g.  Mid point (1") at waist line.  It should look something like this >
    2. Back Darts: Do the same as the front darts with the widest part of the dart at the waist line.  Measure the darts so that they are the same lengths as your front ones.  


W H A T  P I E C E S  S E W  T O  W H A T


This key uses my pattern measurement guide above.  If this gets confusing, refer to my diagram of her dress to make sense of it.  Make sure you use a basting stitch for your pattern (A loose stitch that you can easily pull out if you make mistakes).  Remember, these are directions for designing the pattern, not the actual costume.

F =  Front
FB = Front Bodice
B = Back
1SS = 1st Side Skirt
2SS = 2nd Side Skirt

Example: F a-b will indicate the front piece of fabric from point a to point b.


10.  After everything has been sewed, try it on in a mirror.  Mark/pin where you need to make adjustments, and then adjust it.  You may also need to deepen your darts for a better fit.

11.  Once your costume fits you well, take a new colored marker and mark the seams.  Wherever there's stitches, mark it!

12.  Cut where you've marked excluding the darts.  You should have 8 pattern pieces total.


S E W I N G  T H E  F I N A L  C O S T U M E

Alright, now that we have our pattern ready, we can begin work on our actual costume (Finally!)

You will need:

  • Costume fabric 
  • fabric lining (if you want a better quality costume)
  • sewing machine
  • scissors
  • thread
  • Bias tape or piping (if you're not lining your costume)

  1. Iron your costume fabric and lining.  
  2. Pin your pattern pieces to your fabric/lining.  Mark your pattern.  (IMPORTANT: your pattern does not include the seam allowance, so that will need to be added!) 
  3. Pin and sew your darts as you did above for the pattern.  (Make sure to sew the same darts in your lining as well)
  4. If you're using lining, pin the matching lining pieces to the costume fabric.  Make sure you're pinning the "bad" sides facing together.  Begin sewing your lining pieces to your fabric pieces where the green is highlighted below.  Then turn the pieces right side out and iron your creases.   
  5. Begin sewing pieces together!  


If you're not using lining, you can use bias tape to give a neat hem to your keyhole.  Here is a good tutorial for that from an amazing lady at Sugar Tart Crafts: Keyhole Dress Tutorial

If you're not familiar with adding an invisible zipper, here's a really helpful tutorial at Coletterie: Invisible Zipper Tutorial


E M B E L L I S H M E N T S

The bodice was the trickiest part.  I ended up sewing in a bra and building the bodice around it just so it would fit perfectly without unsightly puckering.  However, I soon realized this would not have been necessary if I placed the bodice ends lower on my hip.     


For the detail, I painted fishnet stockings a blue/silver color and used fabric glue to secure them to the shoulders.  I then used arrowhead smocking to create the triangular "dragon scales".  This website will give you great insight on how to achieve this. 


B R E A K D O W N  of  J E W E L R Y 

I made Daenerys' dragon claw necklace out of polymer clay then painted it with acrylic paints and varnish.  (insert shameless plug: I have this and more available in my Etsy shop!  Click the link to your right!)  You can buy all of these materials at your local craft shop as well.


 Here is my version of her single dragon claw necklace that comes in a cute little rustic pouch.  ( I also have the golden double claw version for sale.)


Dany's slave collar is also available in my Etsy shop in case you're doing her outfits from later in the season.  This collar also goes with her long draped white slave dress she wears.


Check out my other blog post to see other Dany jewelry I've created (her ring and bracelet!).  Check these out here: Daenerys Swag


Anywhos, I hope this post can help some of you along your way to awesome GoT cosplays.  I would loooove to see how your cosplays come out, so shoot me some pics when you're finished.  ^_^  If you guys have any questions, email me at n.jellyfishsoup@gmail.com!  Good luck and remember, fire cannot kill the dragon!


Saturday, May 11, 2013

Daenerys Targaryan Make-up Test


So this is my make-up test for my Daenerys Targaryan cosplay.  I'm somewhat pleased with how it turned out, but I do need to work a little bit more on the highlighting and contouring.

I really wish I had the time to sculpt and cast some dragons for this cosplay!  Ravendark Creations on Etsy sells A M A Z I N G dragon props that would be great for any Daenerys cosplay, but alas, I'm super cheap.

Ravendarkcreations.etsy.com

Anywhos, I hope to post a few tutorials this week in the Daenerys variety so stay tuned : )