Wednesday, June 29, 2016

Daenerys Dragon Collar for Game of Thrones Cosplay


Hello my dragon queens!  I FINALLY finished this Dany inspired dragon collar.  Phew!  I'm pretty happy with how this came out.  She wears this piece at the end of season 5 of Game of Thrones and the beginning of season 6.  It's really awesome symbolism to see a dragon curled around her neck again like we saw when her dragons were still babes.  Okay, so a little about the collar:

Every inch was patiently hand sculpted so that every part of this collar would look authentic.  I built the sculpt around a stainless steel skeleton then moved around the clay until I was happy.   This is where you have to be patience if you're making your own.  I used a tooth pick and clay picks for the details.


For the scales, I cut a triangle in a piece of thin cardstock and pressed it into the clay to create this pattern.  I then went back in with clay tools to give individuality to each scale.


The tail end was done the same way.


Okay, so the attachments were what gave me the most trouble.  I experimented with a lot of mediums and ultimately decided EVA foam would be best for them.  I cut out different shapes until I was happy and attached with a strong adhesive.  I used the opposite side of an exacto blade to press details into the foam until I thought it looked cool. :p  Painted with a dark silver first, letting it slip into the creases, then went over with lighter silvers.  Finally I finished with a little Silver Leaf Rub and Buff to give this piece a very authentic metal finish despite being clay.


And this is the finished product!  Yay!


This pic was taken before I put the final paint coat on, so it photographed a bit dull.  Ugh! (I was just really impatient to be back in my Dany wig! :P )

I currently have these dragon collar on sale in my shop!

I want to also make a tutorial for this dragon collar, but I'm not sure how helpful it will be just because of how involved it was to make this.  If you're making your own, feel free to drop me a comment or message and I'll try to help you the best I can! :D

Valar Morghulis you Khaleesi's out there!


Tuesday, March 29, 2016

Jinx League of Legends Wig Guide


Hello my little rocket launcher wielding manics! I'm currently working on finishing my own Jinx cosplay and wanted to share my research to help y'all with your own Jinx wig search.  If you're interested in learning about the difference between wig fibers, check out my post on Daenerys Wig Guide for more info.


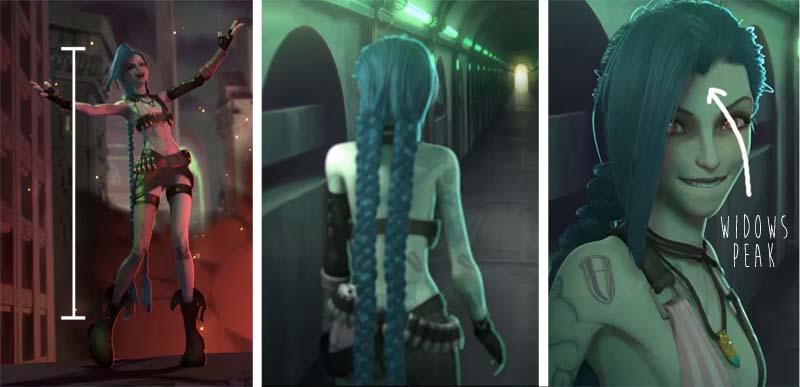
JINX HAIR BREAKDOWN

I'm going to be using images from the Get Jinxed music video for reference since that's the version of her cosplay I feel is most popular.


Length: Jinx's hair comes down to about her mid calf. So depending on your height, you would be looking at around 45"-55" (114-140 cm) for the wig.

Widows Peak: Jinx has a little widow's peak, which is basically a dip in the hairline along the forehead.

Color: Jinx's hair is a classic blue.

Style: Jinx has a long length, pulled back, with bangs that go just below her chin. A style with little to no layers would work best for her braids to prevent fly-a-ways.


WHAT'S THIS LACE FRONT BUSINESS?


So for Jinx's wig, a lace front would really work best.  Lace front wigs have exactly that: a piece of lace attached at the front where the hairline would be.  Small amounts of fiber are then usually hand ventalated to create a natural looking hairline.  These wigs work best for styles where the hairline is visible, such as Jinx's.  However, because they're often hand ventilated, they tend to be more expensive, so you'll need to consider that when planning your cosplay budget.  Also, they need a little more work when putting on then regular wigs.  The lace front will need trimming, and you'll need to apply wig tape or glue to secure the lace hairline to your head. (here's a tutorial for that) It's a bit of a pain, but definitely worth it if it's within your budget!


WIG OPTIONS


Tauriel Classic in Electric Blue


Arda wigs are easily some of my favorite wigs.  I've never had an Arda wig that I was dissatisfied with, and I've always been very impressed with their customer service.

Price: $72

Length: 35.5″ (90 cm)

Color: electric blue

Pros: 
  • heat resistant for easier styling
  • fibers work well with hair products
  • matte, natural color
  • widow's peak
  • lace front for realistic hairline
  • available in accurate color 
  • no layers for easy braiding

Cons:
  • falls shorter than Jinx's hair
  • will require cutting and styling 
  • more expensive than non lace fronts
  • lace front takes some work to put on


Suzi Classic in Electric Blue


I own this wig in platinum blonde and love it.  If you're not an expert with the scissors, this is a good buy 'cause Jinx's bangs will be easy peasy to do--no cutting necessary!  Here's an awesome tutorial for a Jinx styling with this wig from the very talented Kinpatsu!

Price: $70

Length:  8” (20 cm) at the shortest layer, 35.5″ (90 cm) at the longest

Color: electric blue

Pros: 
  • heat resistant for easier styling
  • fibers work well with hair products
  • matte, natural color
  • widow's peak
  • lace front for realistic hairline
  • available in accurate color
  • short layers require no cutting for bangs

Cons:
  • falls shorter than Jinx's hair
  • more expensive than non lace fronts
  • lace front takes some work to put on


Delilah Classic in Electric Blue


The Delilah is an awesome buy because of its long length.  This wig has bangs so you won't need to do any cutting.  However, it's not a lace front, so you won't be able to pull back the hair and expose the hairline without some ninja styling to hide it.  Also, be aware that longer wigs are heavier wigs, so you'll need major bobby pinning to keep this from sliding.   

Price: $65

Length: 60” (152 cm)

Color: electric blue 

Pros: 
  • awesome long length
  • heat resistant for easier styling
  • fibers work well with hair products
  • matte, natural color
  • available in accurate color
  • has bangs so no cutting necessary

Cons:
  • no widow's peak
  • no lace front, so less natural hairline
  • heavy so will take some finesse to keep from sliding
  • bangs a little short


Styled Jinx Wig by uFashionWigs


I love supporting fellow Etsy sellers whenever I can, and this awesome seller has this adorable pre-styled Jinx wig.  She also has really good reviews, so for the price and convenience this wig is a total awesome buy!

Price: $29

Pros: 
  • already styled!
  • good length
  • nice coloring
  • easy to wear
  • a really reasonable price

Cons:
  • not a lace front, so less realistic hairline
  • no widow's peak


Straight 40" in Miku Blue


I've never purchased from Dolluxe, but I've heard good things.  This wig comes in a close color match to Jinx's and has bangs already, so it won't require cutting.  Woo!  

Price: $45.99

Length: 40" (100cm)

Pros: 
  • accurate color
  • no layers for easy braiding
  • bangs already cut

Cons:
  • not lace front so less realistic hairline
  • no widow's peak
  • falls shorter than Jinx's hair

Purchase: dolluxe.com


Drop me a comment below if you guys have other wigs you've used or are thinking of using.  I'd love to add them to this list!  Good luck with your cosplay, my loves!


Monday, March 7, 2016

Daenerys Ring Game of Thrones Season 5


Hiya!  So here is my updated version of my inspired Daenerys ring from Game of Thrones.


I ended up using Super Sculpey instead of Original Sculpey and was a lot more satisfied with the results.


Dany typically wears the ring on her ring finger, but the size I made was a little too big for mine. X )


You can purchase the ring in my Etsy Shop here:

Valar Morghuilis!


Tuesday, December 1, 2015

New Jinx Slayer Choker in Shop!


Greetings my fellow ADC's!  Sharing with my most recent creation: A Jinx Slayer inspired choker!  I originally made this for my own Jinx cosplay but I figured I could make this available in my Etsy shop as well for anyone who likes it. :3


I hand sculpted the charm with polymer clay, so it has a good weight.  Decided to paint the holes with black to give it a more cartoon-y look that pairs well with the sculpt.  


The charm is attached to the velvet choker with nickel free chain. (for sensitive skin!)


It ended up coming out way cuter than I imagined, so I'm pretty happy with it!


Friday, November 13, 2015

STAR WARS Holiday Printables


Hello my lovely Jedi's!  Here are some Star Wars themed printables to make your holidays a little more festive.  Simply click the photo, right click and save! (ctrl + click for Mac users)  May the Force be with you!  (PS: for those of you looking for higher resolutions, feel free to drop me an e-mail and I'll send the larger file to you! n.jellyfishsoup@gmail.com)


5 x 7 postcard


5 x7 foldable card


Wednesday, August 5, 2015

New Jinx Bullet Necklace in the Jellyfish Soup Etsy Shop!


Hi there my loves!  

I wanted to share with you a new product recently listed in the Etsy shop: Jinx's Bullet Necklace.  Jinx, a League of Legend champion, is a little trigger happy, so it makes sense she'd wear a prized bullet just over her heart.  


jinx bullet necklace


Each necklace is hand sculpted out of clay with a skull design carved into it.  I can also carve your own custom design into the bullet!


The necklace is adjustable and comes with a separate adjustable choker like Jinx wears.


This necklace is a perfect finishing touch for any Jinx cosplay, and the perfect geeky touch to your everyday wear.  Disclaimer: Necklace may increase chance of penta's!


Monday, April 27, 2015

League of Legends' Jinx Cosplay Makeup Test


Hi there!  It's been a while, but I'm excited to show you guys my current endeavor: Jinx.  She's a spunky champion from the online game League of Legends. (which I often stream on Twitch!)


All in all, I think the makeup test came out decently, but I have a lot to improve on.  I'm going to be dying a lace front with with a widow's peak for the actual cosplay.  (so long Elsa wig!)  Also, in these pics, I used a phone app to change the color of my eyes, because I'm currently still waiting on my pink circle lenses to arrive. :3


Also, I need to work on my deranged, psychotic look, because Jinx be cray cray.


Currently constructing her rocket launcher, Fishbones, and I'll be posting those pics soon!  However, I'm a little stumped on how to construct the bullets on her bullet belt.  Anyone have any ideas? X )


Thursday, March 19, 2015

Realistic Harry Potter Wand Replica Tutorial


Hello there my little muggles!  Today I'm gonna share with you the step by step process I use to make Harry Potter wands.

Last Halloween, I went all out and held a huge Harry Potter party.  I'm talkin' Quidditch pong, hand sculpted wands for each guest, and enough butter beer and chocolate frogs to fill the Ministry of Magic.  So, while I was planning for this partay, I scoured the internet (aka Pinterest) for the HP tutorials I could get my hands on.  The only thing is, I couldn't find the kind of wand tutorial I was looking for, so I decided to share one myself.

Remember, your wand doesn't have to be perfect.  The imperfections are what will give your wand character and make it your own, so just have fun with this tutorial!

M A T E R I A L S : 

  • Wooden dowel 1/4" wide and at least 14" long
    • You can get these from craft stores and even hardware stores.  You can also save time from sanding if you can find cooking chopsticks.
  • Sculpey Polymer Clay
  • Sandpaper
  • Scissors or something to cut through the dowel
  • Tape measure
  • Tooth pick or clay tool
  • Paint brush
  • Brown, red, white and black acrylic paint
  • Satin Gloss


P R O C E D U R E : 

  1. Cut your dowel to about 14".  I find this is a good length for wands and is around the size the replicas are sold at.  However, if you want to be true to the book, make yours around 11".  You can find exact sizes of wands on the Harry Potter Wiki.


  2. Sand down one end of the dowel until to you get a smooth tapered edge.  I like to start with a coarse sand paper and then finish off with a finer one.  (You can skip this step if you're using cooking chopsticks instead!)  


  3. Roll your polymer clay about 4 inches long and 1" thick.  Throughout the tutorial, add and take clay as you need, whatever looks better to your eye. 


  4. Insert the blunt end into the clay you rolled out and use your thumb in one direction to smooth out the line.  Make sure your clay is firmly attached the wooden core with no air pockets underneath.  Trapped air could cause your sculpt to crack in the oven.


  5. Using your thumb in a upward motion, smooth a 2" space between two larger mounds.  I find it's easier to hold the wand by the wood with one hand and then use my other hand to smooth. 


  6. Again, using your thumb, smooth some of the top mound upwards about 3".  Again, make sure all of your clay is compact with no air pockets underneath.    


  7. Take a tooth pick and start marking the divides.  Use jagged, uneven, motions to give the impression of roughly cut wood.  And remember, it doesn't have to be perfect.  In fact, the more imperfections, the more it'll look like real wood!


  8. Take your tooth pick and make a slanted divide 2" above the top mound around the wand.  Roll your toothpick between your thumb and index finger in an upward motion from the that divide to smooth the indention.  Use your thumb to smooth this piece of clay upwards until it is flush with the wood.  Get this topmost section of clay as smooth as possible. 


  9. Using the side of your toothpick, slice gently in an upward motion at the portion above the top mound.  You're trying to give this portion small flat areas that will give the appearance of hand whittled wood. 


  10. Now take your toothpick to the top mound and begin making upward slices and indentions into the clay.  Make sure you gouge out small indentions to the give the wand more character.  You can also make light slanted lines in a criss-cross fashion to give the wood more texture.  


  11. Next roll 2 clay balls about 1/4".  Place them as shown in the image.


  12. Use your toothpick to roll downwards at the edges to blend them with the wand to create wood knobs.  


  13. Next make upward slices with the tip of your toothpick to give the impression of bark.  Make sure the slices are rounded around the knobs you added.  Take your time and scrap away the clay as you go so you don't end up with a lot of little clay specs all over your wand. 


  14. Do the same thing with the lower mound as you did in step 10.  Make your indentions a little more deep and chaotic with this end.


  15. Go over your entire wand, adding detail wherever you think it's needed.  


  16. Next, place the wand on a cookie pan lined with parchment paper, and throw this in the over at 275°F for about 10 minutes.  After your timer goes off, check to make sure your clay isn't still soft; you may need an extra 5 minutes.  If you see any browning of the clay, remove it immediately.  Try not to cook for longer than 15 minutes as we have some very thin areas of clay on the wand and they tend to burn easily.
  17. Once cool, you can sand away any areas that need smoothing like your top portion of clay that should be flush with wood.  
  18. Next, using your black paint, begin covering all the cracks of the wands handle.  I find that adding a little water to the paint makes this job a lot easier.  After the first coat dries, I usually go over with a second coat of black to fill any holes or crevices I missed earlier.  


  19. Add a small amount of red and black to your brown and cover the rest of your wand above the top mound.


  20. Once dry, mix a little black with some brown paint.  Using a dry brush, dip into your paint, dab excess onto a paper towel, and dry brush paint over the entire handle.  You use a dry brush painting method so your paint doesn't seep into the cracks; we want those nice and dark to give good dimension to our wand.  After that layer dries, do the same but with only brown.  You're gradually building up lighter colors, or highlight, on your handle.  You can also mix a touch of white with your brown to give an even brighter highlight.  


  21. Next mix your red and brown and dry brush the whittled portion of your wand to give a red highlight.


  22. Go in with dark brown and add shadow to the divides and anywhere else you missed.
  23. Once dry, cover the entire wand in 2-3 coats of satin gloss for protection and shine.
  24. Lastly, hold up your wand and shout EXPECTO PATRONUM!


And if you haven't the time to make your own wands, you are certainly welcome to order them from my own Etsy shop (link below). :D


I really hope this tutorial could be of some use for those of you who are Harry Potter fans!  If you liked this tutorial, please follow me for more geeky tutorials and cosplay!