Thursday, March 19, 2015

Realistic Harry Potter Wand Replica Tutorial


Hello there my little muggles!  Today I'm gonna share with you the step by step process I use to make Harry Potter wands.

Last Halloween, I went all out and held a huge Harry Potter party.  I'm talkin' Quidditch pong, hand sculpted wands for each guest, and enough butter beer and chocolate frogs to fill the Ministry of Magic.  So, while I was planning for this partay, I scoured the internet (aka Pinterest) for the HP tutorials I could get my hands on.  The only thing is, I couldn't find the kind of wand tutorial I was looking for, so I decided to share one myself.

Remember, your wand doesn't have to be perfect.  The imperfections are what will give your wand character and make it your own, so just have fun with this tutorial!

M A T E R I A L S : 

  • Wooden dowel 1/4" wide and at least 14" long
    • You can get these from craft stores and even hardware stores.  You can also save time from sanding if you can find cooking chopsticks.
  • Sculpey Polymer Clay
  • Sandpaper
  • Scissors or something to cut through the dowel
  • Tape measure
  • Tooth pick or clay tool
  • Paint brush
  • Brown, red, white and black acrylic paint
  • Satin Gloss


P R O C E D U R E : 

  1. Cut your dowel to about 14".  I find this is a good length for wands and is around the size the replicas are sold at.  However, if you want to be true to the book, make yours around 11".  You can find exact sizes of wands on the Harry Potter Wiki.


  2. Sand down one end of the dowel until to you get a smooth tapered edge.  I like to start with a coarse sand paper and then finish off with a finer one.  (You can skip this step if you're using cooking chopsticks instead!)  


  3. Roll your polymer clay about 4 inches long and 1" thick.  Throughout the tutorial, add and take clay as you need, whatever looks better to your eye. 


  4. Insert the blunt end into the clay you rolled out and use your thumb in one direction to smooth out the line.  Make sure your clay is firmly attached the wooden core with no air pockets underneath.  Trapped air could cause your sculpt to crack in the oven.


  5. Using your thumb in a upward motion, smooth a 2" space between two larger mounds.  I find it's easier to hold the wand by the wood with one hand and then use my other hand to smooth. 


  6. Again, using your thumb, smooth some of the top mound upwards about 3".  Again, make sure all of your clay is compact with no air pockets underneath.    


  7. Take a tooth pick and start marking the divides.  Use jagged, uneven, motions to give the impression of roughly cut wood.  And remember, it doesn't have to be perfect.  In fact, the more imperfections, the more it'll look like real wood!


  8. Take your tooth pick and make a slanted divide 2" above the top mound around the wand.  Roll your toothpick between your thumb and index finger in an upward motion from the that divide to smooth the indention.  Use your thumb to smooth this piece of clay upwards until it is flush with the wood.  Get this topmost section of clay as smooth as possible. 


  9. Using the side of your toothpick, slice gently in an upward motion at the portion above the top mound.  You're trying to give this portion small flat areas that will give the appearance of hand whittled wood. 


  10. Now take your toothpick to the top mound and begin making upward slices and indentions into the clay.  Make sure you gouge out small indentions to the give the wand more character.  You can also make light slanted lines in a criss-cross fashion to give the wood more texture.  


  11. Next roll 2 clay balls about 1/4".  Place them as shown in the image.


  12. Use your toothpick to roll downwards at the edges to blend them with the wand to create wood knobs.  


  13. Next make upward slices with the tip of your toothpick to give the impression of bark.  Make sure the slices are rounded around the knobs you added.  Take your time and scrap away the clay as you go so you don't end up with a lot of little clay specs all over your wand. 


  14. Do the same thing with the lower mound as you did in step 10.  Make your indentions a little more deep and chaotic with this end.


  15. Go over your entire wand, adding detail wherever you think it's needed.  


  16. Next, place the wand on a cookie pan lined with parchment paper, and throw this in the over at 275°F for about 10 minutes.  After your timer goes off, check to make sure your clay isn't still soft; you may need an extra 5 minutes.  If you see any browning of the clay, remove it immediately.  Try not to cook for longer than 15 minutes as we have some very thin areas of clay on the wand and they tend to burn easily.
  17. Once cool, you can sand away any areas that need smoothing like your top portion of clay that should be flush with wood.  
  18. Next, using your black paint, begin covering all the cracks of the wands handle.  I find that adding a little water to the paint makes this job a lot easier.  After the first coat dries, I usually go over with a second coat of black to fill any holes or crevices I missed earlier.  


  19. Add a small amount of red and black to your brown and cover the rest of your wand above the top mound.


  20. Once dry, mix a little black with some brown paint.  Using a dry brush, dip into your paint, dab excess onto a paper towel, and dry brush paint over the entire handle.  You use a dry brush painting method so your paint doesn't seep into the cracks; we want those nice and dark to give good dimension to our wand.  After that layer dries, do the same but with only brown.  You're gradually building up lighter colors, or highlight, on your handle.  You can also mix a touch of white with your brown to give an even brighter highlight.  


  21. Next mix your red and brown and dry brush the whittled portion of your wand to give a red highlight.


  22. Go in with dark brown and add shadow to the divides and anywhere else you missed.
  23. Once dry, cover the entire wand in 2-3 coats of satin gloss for protection and shine.
  24. Lastly, hold up your wand and shout EXPECTO PATRONUM!


And if you haven't the time to make your own wands, you are certainly welcome to order them from my own Etsy shop (link below). :D


I really hope this tutorial could be of some use for those of you who are Harry Potter fans!  If you liked this tutorial, please follow me for more geeky tutorials and cosplay!

Thursday, January 8, 2015

New Daenerys Jewelry Set in my Etsy Shop


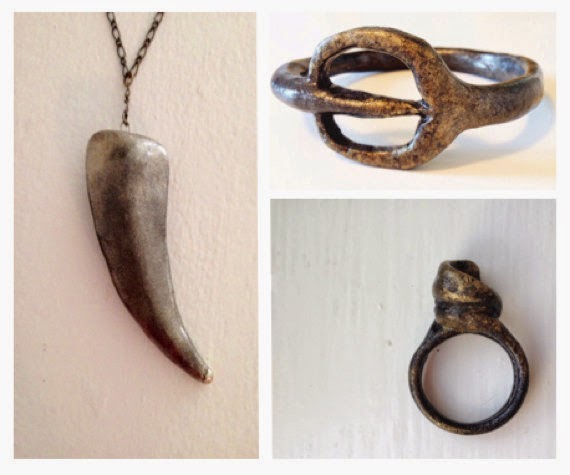
Hello my winter children!  I wanted to share with you the three piece Daenerys Set I have now available in my Etsy shop.  (Click here to see my shop!)  The set includes Daenerys' necklace, her bangle bracelet, and ring.  Each item can be customized to fit you best!  Just leave me a note in 'Note to Seller' with detailed instructions.

As a thank you to those of you who follow my blog, please use this coupon code for 10% your entire order:

JELLYFISHSOUP10
for 10% off!

That aside, are you guys excited for season 5 coming out?!  I am!  I'm currently working on some of the jewelry I've been able to spot in set photos and promo vids, so check back soon for those pieces!

Peace out!


Friday, January 2, 2015

Princess Serenity Cosplay Overview


Hi there my loves!  Long time no post!

I wanted to share with you all my recent endeavor at a Princess Serenity cosplay.  Now, as usual, I somehow managed to pull this costume together in two days.  I'm starting to realize I only finish cosplays when I need them in the next 36 hours. -_-  I envy those cosplayers that take their time to put together quality costumes instead of my methods: running around like a crazed monkey woman frantically throwing fabric at a mannequin until it somewhat resembles what I have in mind.

(Picture relevant)

H O W  I  C O N T R U C T E D  the  D R E S S: 


I used a white chiffon for the bodice and the draping.  The dress had two layers of draping.  If you're making your own dress, search for a simple empire waist line pattern and you'll be good to go.  A lot of Serenity cosplayers use the Kwik Sew dress pattern here.

The back bow was constructed from a white tulle kind of fabric.  I also decided against adding a long train as this wasn't intended to be a contest costume, I was just wearing it as I walked around the convention.  (Walking around with long trains is murder!  Everyone and their mother will be stepping on them and tripping you.) 


I couldn't find the perfect gold color pearls or fabric for the embellishments, so I ended up painting them both with an Elegant Finish Metallic Paint in champagne gold.  The fabric was originally some teal fabric I had left over from another costume that I ironed onto fusing backing so the fabric wouldn't fray after cutting the circular shapes.  I fixed the golden circles and pearls to the bodice using Tacky Glue, my go-to adhesive for virtually everything.   


These shoulder cuffs were a pain. -_-


For the cuffs, I ended up having to make a spiral frame with stainless steel wire that would would clasp onto my shoulder.  I then rolled up white tulle and began covering the frame, stitching the pieces in place as I went.  

M A K E U P and H A I R : 


So, for the makeup I kept it pretty simple.  Just a primer and BB cream along with some fake eye lashes.  For the crescent moon, I sculpted it out of Sculpey polymer clay, painted it, sealed it, and stuck it to my face with spirit gum. 


For the hair, I used my real blonde for the odangos, and then clipped in the extensions for the pig tails.  I recommend cutting all different length layers into your extensions 'cause that'll help them tangle less.  I also used a faux fringe that I got off eBay for like 5 dollars.  And if you didn't notice, I totally forgot the shoulder cuffs at home. :(


So that was my attempt and Princess Serenity's dress.  Drop me a message or comment if you guys have any questions or need some advice on your own Serenity cosplay! 

PEACE OUT LOVES!


Sunday, September 7, 2014

DIY Elsa Snowflake Tutorial


Hello there my little snow bunnies!  So as promised, here is a super simple tutorial for making your very own Elsa snowflake hair accessories!

Here's what you'll need:
  • Plastic snowflakes (I used these notions from Jo-Anns)
  • Tacky glue (or any other glue you have at home)
  • Jewelry wire in 12 gauge (I like this one also from Jo-Anns)
If you don't want to order online, I suggest stopping in at your nearest craft store and checking out the button aisle.  There are tons of cute snowflake buttons that work just perfectly for Esla's hair accessories.   


Okay, so let's get started!

Step 1: Curl your jewelry wire into a spiral by wrapping it around a pen or a paint brush.  If you have something that tapers, like the end of a pen, it's easier to get the gradual smaller coils.


Step 2: Take a nail filer or sand paper and smooth the edge of the spiral so it's smooth and won't cut an arm off.  

Step 3: Take your glue and add a generous amount along the largest coil and place it in the center back of your snowflake.  Once you stuck the spiral to the back, I like to add a little more glue just to be safe, 'cause you don't want them falling out while you're building ice castles!  


Step 4: Let it dry and VOILA!  Super cute Elsa Snowflakes!  Just twist them in your hair until they're nice and secure.  You may need to press the spiral a little flatter if you're adding the snowflake to a thinner portion of hair.   


The spiral attachments are really the best way to go, I think, 'cause they stay in place and you don't have to worry about unsightly bobby pins poking out!  


I've also experimented with making Elsa's snowflakes out of crystal beads. (seen in the photo below)  They're a little more complex, but I can make a tutorial for them if anyone is interested.  If you don''t have the time or desire to make your own, you can also purchase the whole set below in my Etsy shop! (Link to the right ---->)


I'll also be uploading my tutorial on how to style Elsa's wig and how to draft a pattern for her costume, so check back soon! :D

As usual, leave me some comments below if you have any questions or just want to share your own creations!  


Thursday, August 21, 2014

Sansa Necklace and Makeup Test

Hello my little doves! So when I cosplayed as Daenerys last year, I had a lot of peeps say that I looked nothing like her. That I infact, looked a lot like Sansa Stark. I personlly don't think I look like either, but I decided to go ahead with a little makeup test anyways to see.


Annnd I was right.  But that's okay, you gotta cosplay whoever you want, brah!  I really love Sansa's character development within the books, and I really loved how the series underscored that with the change in her look.  I know she dyes her hair in books as well to hide the fact she's Sansa Stark, but the visual and placement of the change in the series was super cool and really made me want to cosplay her! : )  So maybe I will go and buy her wig and get to makin' her birdwear.  

Here's some closeups of Sansa's necklace.


I tried to keep it as authentic as possible with the images I was able to find on the web. 


I tossed around the idea of making a resin mold for the circular and nail pendants.  Ultimately, I didn't think it would be a good weight considering resin is pretty light, so instead I opted for a hand sculpt using Sculpey.  It had a much more realistic weight that stayed in position perfectly around the neck.   


I'm also selling Sansa's necklace in my Etsy shop (link somewhere to the right) for those of you who will be cosplaying her! ---------------> 

Leave me a comment below if you're planning on dressing up as the dark Stark for Halloween or conventions coming up.  I'd love to see pics or just pick your brain about wigs and things :D

And I apologize for taking forev on my Elsa costume tutorial.  Things have been crazy with work and the move, that I haven't uploaded nearly as many tutorials as I would have liked.  Hopefully that'll change now : )