Hi low dress, $27 / Brown cape, $65 / Buckle boots / Skeleton bracelet / Claw jewelry / Topshop palm tree ring / Circle scarf / Boho chic headband / Urban Decay matte makeup / River Island glitter nail polish, $6.45 / A Game of Thrones (A Song of Ice and Fire, Book 1):Amazon:Books / Game of Thrones Khaleesi Mug / Game of Thrones Pop! Television Drogon Figurine
Friday, September 12, 2014
Sunday, September 7, 2014
DIY Elsa Snowflake Tutorial
Hello there my little snow bunnies! So as promised, here is a super simple tutorial for making your very own Elsa snowflake hair accessories!
Here's what you'll need:
- Plastic snowflakes (I used these notions from Jo-Anns)
- Tacky glue (or any other glue you have at home)
- Jewelry wire in 12 gauge (I like this one also from Jo-Anns)
If you don't want to order online, I suggest stopping in at your nearest craft store and checking out the button aisle. There are tons of cute snowflake buttons that work just perfectly for Esla's hair accessories.
Okay, so let's get started!
Step 1: Curl your jewelry wire into a spiral by wrapping it around a pen or a paint brush. If you have something that tapers, like the end of a pen, it's easier to get the gradual smaller coils.
Step 2: Take a nail filer or sand paper and smooth the edge of the spiral so it's smooth and won't cut an arm off.
Step 3: Take your glue and add a generous amount along the largest coil and place it in the center back of your snowflake. Once you stuck the spiral to the back, I like to add a little more glue just to be safe, 'cause you don't want them falling out while you're building ice castles!
Step 4: Let it dry and VOILA! Super cute Elsa Snowflakes! Just twist them in your hair until they're nice and secure. You may need to press the spiral a little flatter if you're adding the snowflake to a thinner portion of hair.
The spiral attachments are really the best way to go, I think, 'cause they stay in place and you don't have to worry about unsightly bobby pins poking out!
I've also experimented with making Elsa's snowflakes out of crystal beads. (seen in the photo below) They're a little more complex, but I can make a tutorial for them if anyone is interested. If you don''t have the time or desire to make your own, you can also purchase the whole set below in my Etsy shop! (Link to the right ---->)
I'll also be uploading my tutorial on how to style Elsa's wig and how to draft a pattern for her costume, so check back soon! :D
As usual, leave me some comments below if you have any questions or just want to share your own creations!
Thursday, August 21, 2014
Sansa Necklace and Makeup Test
Hello my little doves!
So when I cosplayed as Daenerys last year, I had a lot of peeps say that I looked nothing like her. That I infact, looked a lot like Sansa Stark. I personlly don't think I look like either, but I decided to go ahead with a little makeup test anyways to see.
Annnd I was right. But that's okay, you gotta cosplay whoever you want, brah! I really love Sansa's character development within the books, and I really loved how the series underscored that with the change in her look. I know she dyes her hair in books as well to hide the fact she's Sansa Stark, but the visual and placement of the change in the series was super cool and really made me want to cosplay her! : ) So maybe I will go and buy her wig and get to makin' her birdwear.
Here's some closeups of Sansa's necklace.
I tried to keep it as authentic as possible with the images I was able to find on the web.
I tossed around the idea of making a resin mold for the circular and nail pendants. Ultimately, I didn't think it would be a good weight considering resin is pretty light, so instead I opted for a hand sculpt using Sculpey. It had a much more realistic weight that stayed in position perfectly around the neck.
I'm also selling Sansa's necklace in my Etsy shop (link somewhere to the right) for those of you who will be cosplaying her! --------------->
Leave me a comment below if you're planning on dressing up as the dark Stark for Halloween or conventions coming up. I'd love to see pics or just pick your brain about wigs and things :D
And I apologize for taking forev on my Elsa costume tutorial. Things have been crazy with work and the move, that I haven't uploaded nearly as many tutorials as I would have liked. Hopefully that'll change now : )
Tuesday, August 19, 2014
Daenerys Costume Patterns by Simplicity
Hi there! Long time no... type and read? Buwhahaha! So, recently I was wondering through my local fabric store when I stumbled upon an awesome pattern that may be of great use to some of you....
I couldn't believe my eyes when I saw these Dany and Tauriel patterns! And, on top of that, they each look very authentic and very much like the actual costumes. Anyways, I thought I'd share this with ya'll in case any of you were thinking of making these for upcoming cons or Halloween parties.
Let me know if any of you end up using these patterns! I'm very curious to see how it turns on! :3
Oh, and if you're looking to make Dany's Astapor blue dress, check out my guide and tutorial here!
Wednesday, July 16, 2014
Review: Arda Suzi Wig in Titanium Blonde - Elsa Cosplay
Hi there my little snowflakes! So, you may or may not have read my Elsa wig guide I posted earlier. (if not, I recommend a quick peek !) One of the wigs I recommended in my guide is the lace front Suzi Wig in Titanium Blonde made by Arda Wigs. This, in fact, is the wig I purchased for my own Elsa cosplay, and I wanted to share with you my review. Now, the pictures below are of the unstyled wig, and are just to give a better reference for the quality. My review is also based on my needs for this wig, which is for my Elsa cosplay. You may be purchasing this wig for an entirely different character, and if so, just ignore my Elsa comparisons!
Attesting to its popularity, this wig has been out of stock forever. Now, that doesn't mean you can't order it, it just means you may have a long wait before your wig finds its way to your doorstep. (ie ORDER EARLY!) I ordered mine at the beginning of February and didn't receive it until almost the end of March. Now, Arda warns you that you're in for a wait because of all the backorders, so waiting until the week before your con to order the Suzi wig is out the window.
Length was spot on. I did a quick braid to give you a better idea of how long the styled wig will rest. However, the volume isn't up to Elsa code. When styling, you will need to pull the braid very loose to mimic her wider braid. You can also achieve this by adding in more wefts for greater volume. Here's a great tutorial for that.
As far as color goes, I could not be more ecstatic. Too often do you buy wigs that end up being the totally wrong shade when you finally get them in front of you. Titanium blonde has the perfect golden yet icy undertones that looks exactly like Elsa's.
This is a lace front wig which you can see hanging from the hairline. It comes with a good amount of lace in the front to give you plenty of room to work with incase you want to add more strands on your own. Personally, I don't think that will be necessary if you're using the wig for Elsa.
The picture above doesn't do the layers justice, but I was also very pleased with them. They're essential for easy styling of Elsa wispy pulled back bangs, and I did not want to have to cut them myself. (I'm dangerous with scissors, like that time I tried to cut my own bangs... oh, man!)
As far as color goes, I could not be more ecstatic. Too often do you buy wigs that end up being the totally wrong shade when you finally get them in front of you. Titanium blonde has the perfect golden yet icy undertones that looks exactly like Elsa's.
This is a lace front wig which you can see hanging from the hairline. It comes with a good amount of lace in the front to give you plenty of room to work with incase you want to add more strands on your own. Personally, I don't think that will be necessary if you're using the wig for Elsa.
I was really pleased with the widow's peak on this wig. It was really well ventilated - which is the process of tying fibers to your wig. This makes the Suzi wig have a very realistic hairline that looks very similar to Elsa's. A lot of precision and care went into hand ventilating this hairline. And because this wig is a lace front, it gives the perfect realistic hairline for Elsa.
The picture above doesn't do the layers justice, but I was also very pleased with them. They're essential for easy styling of Elsa wispy pulled back bangs, and I did not want to have to cut them myself. (I'm dangerous with scissors, like that time I tried to cut my own bangs... oh, man!)
So to sum up my review, here's my ratings:
color: ♥ ♥ ♥ ♥ ♥
length: ♥ ♥ ♥ ♥ ♥
volume: ♥ ♥ ♥ ♥ ♥
quality: ♥ ♥ ♥ ♥ ♥
Thursday, March 27, 2014
DIY Game of Thrones Premiere Party
Hey there my little dragons! With the GoT premiere right around the corner, I'm sure a lot of you are super excited to witness your favorite Westeros and Essos heroes' stories unfold. And why not celebrate with a party? (I feel like I say that way too much) So I put together a little party pack for those of you holding a Game of Thrones party coming up! It includes all of the following:
- Premiere Invitation 4.25" x 5.5"
- Welcome Sign 8.5" x 11"
- Red Sour Wine Label 4" x 5"
- Shade of the Evening Water Bottle Label 8.5" x 2"
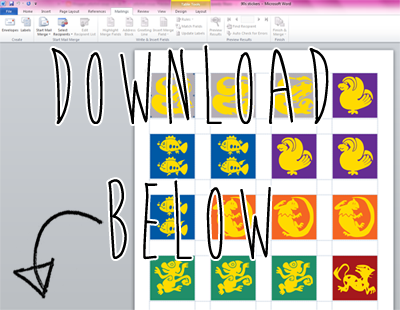
- 6 House Flags (Banner and Badges)
I recommend using the house flags in two ways: both as a banner and as badges. So you can print out the flags, glue them or tie them to string, and make a house garland out of them. Also, you can print them out on card stock or plain paper with laminate, attach a pin to them, and let your guests show their colors by proudly representing their favorite house all night.
You're welcome to use these printables for your own non-commercial use only.
OR
Click the images below and 'save as'.
Enjoy!
Wednesday, March 26, 2014
DIY 90s Party
The 90's in two words: Backstreet Boys. AMIRIGHT?! Well, whatever the 90's mean to you, we can all agree that some pretty rad stuff came from this boy band listinin', parachute pant wearin', Pokemon card tradin' decade.
A M B I A N C E
Alright, the excitement of throwing an epic 90s party has settled, and now you're asking yourself where do you begin. And the answer to that is: with decor, of course! When your guests arrive, you want them to feel like they just Mighty Max'ed themselves back twenty years into the past. If you were a 90s child yourself, then it's time to dig out those ol' toys. If you're lucky, maybe some of your really cool stuff managed to hide itself so well in your ma's attic, that it was able to survive the childhood eating monstrosity that is garage sales. If not, then no worries, you have plenty of other options at your fingertips, such as online shopping. Amazon and eBay are your new BFFs. There's tons of old memorbilia on both sites. And don't forget, you can always check out your local thrift shop. Those places are filled to the brim with outdated merch perfect for any decade party.
Okay, so let me give you some inspiration by sharing how I decorated for my own 90's party.
1) The easiest way to bring people back in time: fill the walls with posters from the 90's. These posters of Vigo (from Ghosterbusters 2) and Kramer (from Seinfeld) are classic images that represent 90's pop culture.
Both of these posters were purchased from Amazon. Totally optional, but we also bought cheap frames from JoAnn fabrics to add some class.
I can't lie. I had these two posters way before I ever thought of having a 90's party. Judge if you must.
2) Another way to add 90's charm: place old VHS tapes around. I actually found mine in the attic. But if you weren't a creepy hoarder like myself, you can always buy cheap VHS tapes from eBay, thrift shops, or even garage sales.
I also lucked out and found my old Sailor Moon wall scroll, and instantly I knew this had to be the image that greeted my guests as they walked into the house. Buwhahahaha!
3) Another great decor tip: Pokemon cards. C'mon, we all had them, and if you still do, they're a great way to spruce up a boring table. Plus, they double as an activity for the guests that still remember how to play. Just don't put your Charizard card out, 'cause you know one of your girlfriends is going to bring the super shady dude she's dating, and he's gonna be eyein' your sweet Char card with dollar signs in his eyes. Okay, maybe not, but whatevs.
Pokemon cards can be bought for super cheap on eBay. Also, you can buy new packs of the newer Pokemon at the store.
4) Decorate tables with old toys and cootie catchers from your childhood. Everyone made cootie catchers in the 90s. Everyone. But now that we're all grown up, why not spice up the fortunes with a little more adult themes? Just get creative! Here's an easy tutorial to make these in case you forgot: here.
Adding small toys like Chinese finger Chinese finger traps and yo-yo's around will also jog some nostalgia in your guests.
5) Set up tables with different movie themes. This was easily my favorite area of the party: THE JURASSIC PARK TABLE! Beside the dino egg cake pops (recipe below), we set up a monitor that displayed Dennis Nendry head. "Ah, ah, ah, you didn't say the magic word!" This is actually a genius website that let's you explore Jurassic Systems (More on that below).
Additionally, I found some dino wall stickers that I stuck to the table and wall. They add ambiance and they're super easy to just peel off and toss after the party.
M U S I C
You absolutely cannnnnooooot have a 90's partay without some dope 90's tunes. Here's my 90's Spotify Playlist stuffed full of Backstreet Boys and Mariah Carey goodness.
View Playlist Here
E D I B L E S
1) Jolly Rancher punch will quench thirst and nostalgia all in one. This is a super yummy punch that I found on SugarandCharm.com and made a few alterations.
- 3 cups of Pineapple Juice
- 1 64 oz bottle of Cranberry Juice
- 1 bottle of Apple Cider
- 1 liter of Ginger Ale
- 1 bottle of Strawberry infused Vodka
- 1 Orange sliced for garnish

2) Fill up bowls with delicious yummies from your childhood. Any snack that used to be in your 90s lunch bag is perfect. Here are some suggestions: Gushers, Fruit by the Foot, Fruit Roll-up, Dunkeroos (available at Walmart), Warheads, Double Bubble Bubble Gum, Pizza Rolls, Kool-Aid Jammers, Oreo Mud Cups...
Most of these snacks should be available at your local grocery store. For the more elusive edibles, Amazon should have you covered.
3) 90's movie themed cake pops are a must! Everyone loved the dino egg cake pops on the Jurassic Park table, and they were pretty super simple!
You need:
- 1 box of devil's food cake mix
- 3 tbs of Pilsbury chocolate fudge frosting
- 10 cake pop sticks
- 1 bag of white chocolate backing chips
- foam block or cake pop holder
- moss to cover foam block
- Following the directions on the box, bake the chocolate cake as you normally would.
- Once the cake is set and cooled, dump the cake into a large bowl and break apart the cake with your hands.
- Add the frosting 1 tablespoon at a time and combine until you get a consistency that will hold together when rolled into a ball. Devil's food cake is already very moist, so you shouldn't need much; too much frosting will give the cake pops a sickly sweet taste.
- Roll the mixture into balls, and apply more pressure at the top to get a pointier egg shape.
- Add a few white chocolate chips to a small cup and microwave in 30 sec intervals until melted.
- Dip cake pop stick ends into melted chocolate and insert halfway into cake eggs. This is going to make sure your cake pops do not slide off the stick.
- Place into freezer for about 20 minutes.
- Add more chips to your cup and melt again in 30 second intervals. (Don't microwave too long or you will burn your chocolate) Make sure you add enough chips so that you can completely submerge your cake pops into the chocolate.
- Remove cake pops from freezer and dip one at a time into melted chocolate. Swirl and gently tap the pops to remove excess chocolate.
- Stick pops upright into a foam block or cake pop holder and allow to harden.
- Cover the foam with decorative moss.
4) Use brown paper bags to make "lunch bag" goodie bags for your guests to take home when they leave. Write your guests names on each bag - just like mom!
Fill the goodie bags with all things 90s. Here's some suggestions: ring pops, milky gel pens, candy bracelets, War Heads, play dough, grow capsules (just add water!), funky pencils, and pixie sticks.
A C T I V I T I E S
1) Set up a station to play old Nintendo games. Totally tubular, right? I mean, what doesn't bring you back to the 90's like a good ol' round of Super Mario Bros?
There's a few ways you can set this up. VirtualNES.com is a free and legal way to stream your favorite Nintendo games. Simply set up a laptop with the website open and play away! You can also stream the website to your TV using an HDMI cord, Apple TV, or even your Xbox. We used our Apple TV and bought some old school Nintendo controllers that plug into USB. We bought ours from Microcenter, but if you don't have one of those near you, you can always buy it from Amazon or ThinkGeek.
2) You can't party like it's 1999 without 90's trivia. Trivia is a great way to pay homage to 90's pop culture, especially when your teams are named after Legend of the Hidden Temple teams! Woo, go Green Monkeys!
Here's a quick guide to setting up your own 90's trivia:
- Decide your trivia categories
- ex: Music, Movies, TV, Snacks, and World Events
- Come up with your questions or use mine below
- Some of these questions I pulled from inthe90s.com
- Print out Legend of the Hidden Temple teams
- I used Avery 8293 Round Stickers but you could simply print these on card stock, or laminated printer paper, whatever you have.
- Use a white board, poster, or anything large to draw out the categories and points similar to Jeopardy.
- During the party, divide your guests into teams and pass them the sticker/labels you printed out earlier.
- Roll a die or flip a coin to decide who's going first.
- Let the first team select their category and points they want to try for.
- If they answer successfully in under 60 sec, they are rewarded all of the points. If they do not answer successfully, the next team gets a chance to steal for half the points.
- Game play continues until all questions are asked.
3) Set up a desktop or laptop with the website www.JurassicSystems.com. This is a genius website that mimics the computer system in the movie Jurassic Park. You can toggle JP music, pull up the Zebra Girl pic (display zebraGirl.jpg), check the systems, and more. (Hint: make sure you try to access system files for a little surprise - ah, ah, ah, you didn't say the magic word!) If you have an old computer screen lying around, that would be perfect for this!
I hope this post could give you some ideas and inspiration for throwing your own tubular 90's partay! Word to ya motha!
Subscribe to:
Posts (Atom)